Monday, November 26, 2012

Mini-Pizzas using Wilton 6-Cavity Mini Pie Pan


Personal Pan Size Pizzas
Using this mini-pie pan to make pizzas is the perfect way to have pizza even on a weeknight. Each person can have their own pizza and customize it to their topping preferences.


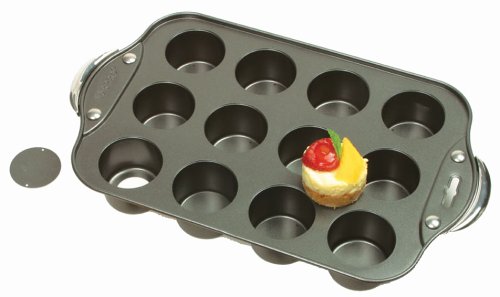
The pie pan makes six four inch by 1-inch pizzas (or desserts--it isn't just for pizza).

I make one pizza crust from scratch, which fills all six wholes and then add sauce, toppings and cheese. it only takes about 8 minutes to cook in the oven. From start to finish we can have homemade pizza in less than 25 minutes (faster than delivery--and healthier since we make  it ourselves). My girls love to add toppings to their "own" pizza.

Making mini-pizzas would be great for a kids party or sleep-over too; each kid gets to make their own pizza.

Of course, you don't need the pan to make mini-pizzas, but it does make for uniform sizes.
The same pan can be used for desserts too. Why not serve each person their own mini-pie or dessert?

Here is a link to the pan on Amazon: http://www.amazon.com/WIEK9-Wilton-Nonstick-6-Cavity-Mini/dp/B008JLSS88 You can pick it up at any store that sells Wilton products. I think I found mine at Walmart.

Wednesday, June 20, 2012

Mini Pizza Bites (made with mini-muffin tin)

Mini Pizza Bites (mini-muffin tin)


I've made these several times now and they are hit with adults and kids. Perfect for taking to a party or a quick weeknight dinner. They also reheat well, so they make great left overs. Kids love to dip the mini-bites into sauce.

The pizza bites are easily adaptable for using a variety of ingredients. I think you could also mix up the basic ingredients and then customize the bites.

I've always used the recipe from the Plain Chicken Blog--Sausage & Pepperoni Pizza Puffs. I always get exactly 24 pizza bites and in bite size version they go fast.

On Pinterest, I've also found a recipe that is guilt-free using cauliflower.


Monday, May 28, 2012

Strawberry Pretzel Salad using Mini-Cheesecake Pan


This dessert is a favorite for its combination of both salty and sweet flavors. It takes some time to make and chill (still easy though), but it is worth the wait. Find a recipe for Strawberry Pretzel Salad here. It really is a dessert though with a pretzel crust, cream cheese middle and strawberry jello top layer. Great for a baby/wedding shower, bbq or just for fun.


I decided to make it in my new mini-cheesecake pan that I purchased from Amazon, so I could have individual servings. For less than $20.00 you can get this pan to make amazing looking desserts. Previously I posted about making mini-oreo cheesecakes that look and taste great. I recommend spraying the pan for the dessert to slide out easily.

The pan makes the perfect bite size portions that can be held in the hand or perfect on a small plate.

Sunday, May 27, 2012

Mini Oreo Cheesecakes -- Mini Cheesecake Pan

Mini Oreo Cheesecakes

I found the recipe for these cheesecakes on Sprinkle Charms blog


I needed a dessert for a baby shower, and since I have been using my muffin tin, I thought these looked perfect. We ended up having 3 trays of dessert--two different cupcakes and the mini-oreo cheesecakes. 
The table looked beautiful! 


Back to the mini-cheesecakes...
They were easy to make and looked/tasted great. I made a practice batch the week before and took them to work--they were gone within 10 minutes. Both times the recipe made a batch of 24 mini cheesecakes. Everyone commented on how cute they looked. It wouldn't have been possible without the use of the mini-cheesecake pan I bought from Amazon. For less than $20 it makes 12 beautiful mini-cheesecakes. 


The bottom of each slot has a removable bottom and the sides are tall, which works much better than using a traditional muffin tin. I highly recommend the Norpro 3919 Mini Cheesecake pan. Recently I made strawberry pretzel salad using the mini-cheesecake pan and they turned out great too.
The mini-cheesecakes and the whipped topping all held up well and didn't melt while on the table. The mini-oreo on top really dressed up the bite size dessert. They also tasted good the next two days, but the  Oreo crust (one big Oreo) did get a little soggy the longer, so I suggest serving that day or the next day.

Great for a party or just for fun!

Monday, March 26, 2012

Egg-Sausage-Cheese Casserole baked in Muffin Tins


I love to eat eggs for breakfast, especially egg casserole, but I don't have time to cook eggs every morning (I have two toddlers). In the past, I've pre-made Egg Casserole on Sunday evening and then set the alarm really early on Monday morning to get up and put it in the oven so it can cook for an hour (or more)--but I need my sleep (I have two toddlers). Egg casserole is great for breakfast because we can eat it every morning. During my research for muffin tin recipes I came across a recipe for egg casserole baked in muffins tins---BRILLIANT! I don't think I will ever make egg casserole in a large dish again (unless I'm cooking for a group--maybe).
Muffin and Mini-Muffin size egg casserole

Advantages to cooking egg casserole in muffin tins:

1. Cooking it in muffin tins takes much less time (more sleep for me).
2. The casserole is neatly portioned for breakfast (and breakfast the rest of the week).
3. Leftovers can be stored easily or frozen.
4. Perfect for toddlers (who also like eggs for breakfast).

I adapted my egg casserole recipe with the one from SparkRecipes. Doing a google search for egg casserole +muffin tins will yield a number of other recipes as well.

Egg-Sausage-Cheese Casserole (no bread)

1-pound ground sausage, cooked and drained (you can do this the night before to save more time)
13 eggs
2 cups cheese
1/2 cup milk
salt and pepper to taste
1 tsp ground mustard

Cook and drain sausage, set aside. In large bowl, beat eggs by hand. Mix in cheese, milk, sausage and spices. Spray muffin tins and add mixture to top of each muffin slot. Cook in preheated 350 degree oven for 20 minutes. Let cool 5 minutes and then remove from muffin tins and serve.

You can cook mini-muffins for 10-12 minutes.

This recipe is versatile. You can add bread, veggies and/or substitue different meats. You can also use muffin tins to cook just eggs.

Step-By-Step Directions

1. Cook and drain Sausage.

2. Crack and beat eggs

3. Add other ingredients
4. Pour into muffin tins
5. Cook and cool
6. Enjoy!


Friday, March 23, 2012

Mini Pumpkin Pies

Mini Pumpkin Pie
I found the directions on how to make these cute pies on the Make and Takes blog. Go there to see step by step pictures.

The best part of making mini-pumpkin pies is that you get 12 equal servings. They can be picked up and eaten by hand (good for a party). They are very cute in mini-size.

Supplies Needed:
12 cup muffin tin
2-3 pie crusts (tip--I reuse scraps by combining them and rolling them out)
4 inch round cookie/biscuit cutter (or a bowl)
favorite pumpkin pie recipe for 1-9 inch pie
whipped topping

Here is my favorite pumpkin pie recipe (Eagle Brand recipe):

1 (15 ounce) can of pumpkin (about 2 cups)
1 (14 ounce) can of sweetened condensed milk
2 eggs
1 tsp ground cinnamon
1/2 tsp ground ginger
1/2 tsp nutmeg
1/2 tsp salt
1/2 tsp cardamon

Whisk pumpkin, sweetened condensed milk, eggs, spices in medium bowl until smooth. Spoon into each crust (can fill up to the top). Bake 10 minutes at 425 degrees and then reduce oven temp to 350 degrees for another 25-30 minutes (check by inserting toothpick in one of the pies--if it comes out clean then they are finished). Cool. Add whipped topping just before serving. Refrigerator left overs.


Wednesday, March 21, 2012

Gooseberries/Advantages of Muffin Tin Cooking


Gooseberry pie is a tradition in my family. We have gooseberry pie at all major holidays: Easter, Fourth of July, Thanksgiving, Christmas and other dates in between. Gooseberries are rather sour, so you either love them or hate them. Here is the Wikipedia link to gooseberries: http://en.wikipedia.org/wiki/Gooseberry My grandma has a couple of gooseberry bushes in her backyard that my grandfather planted before I was born. These plants came from cuttings he took from wild gooseberries out in the country near where his family farmed. Last summer while we were out pond fishing I picked gooseberries from some of these same wild bushes.


Mini Gooseberry Pie (pot-pie size)
Last year I decided to make smaller gooseberry pies using pot pie size pans (about 5 inches). By making mini-pies, I could give one to my grandma, my friend, and keep on for myself. I did some research on mini-pies to find out how long they would need to bake. In the process, I came across recipes that used muffin tins to make pies followed by other sweet and savory foods, like pizza bites and sausage casserole. This was the first time that I was introduced to using muffin tins to cook all types of foods. Doing some internet searches you can find information about mini-pies, including several books that have been published. I plan on reviewing some of these books on this blog. The next mini-recipe I tried was several batches of muffin-tin size pumpkin pies.

Advantages to making food in muffin tins:
1. Perfect when cooking for one/two people.
2. Portion size is built into the meal.
3. Easy to pack leftovers and/or freeze.
4. Mini-muffin size is great for toddlers/kids.
5. Fun for parties/showers.
6. Makes it easy to divide and share with others or take on the go.
7. Cooks faster (important for weeknights, breakfast, or quick meals)
8. Easy to clean up


Gooseberry Pie Recipe (1 9-inch pie or 2 5-inch mini-pies)
3-4 cups of gooseberries-fresh or frozen (do not use canned gooseberries)
3 Tablespoons of Tapioca
2-3 cups sugar (depending on taste)
2 Tablespoons butter
pie crust  (need top and bottom)
a little milk and sugar to brush/sprinkle on top crust of pie

Make pie crust of your choice (or use pre-made)

Crush half of the gooseberries (I use a plastic bag and a rolling pin), add sugar, tapioca. Cook on stove top until thickened then add the rest of the berries and heat through. Pour onto pie crust, dot with butter and add top crust. Brush top crust with milk and sprinkle with sugar. Vent the pie crust in a design of your choice. Be sure to put pie on a cook sheet covered with foil (gooseberry can boil over--very messy to clean up--also recommend cleaning pot and dishes quickly before it dries).

Bake at 450 degrees for 10 minutes then 350 degrees for 30 minutes (for mini pies cut the baking time in half). Always check on your pies while cooking.


Sunday, March 18, 2012

Introduction/First Post

This is really exciting...my first post. First, I want to introduce myself and explain why I've created this blog.

My name is Jamie and I live in a small Kansas town. My husband and I are both high school teachers. I've always enjoyed cooking, but it has become much more important as we've adopted two beautiful girls (our adoption journey could be an entire blog by itself). We are lucky to have two healthy, beautiful girls who we adopted at birth--it was love at first sight. They are now 3 and 18 months old. Our 3-year old is a pretty picky eater, but she isn't just picky, she also doesn't eat very much either. Our 18 month old, loves to eat and often finishes her sister's plate (or from any other plate, if no one is watching).
Family picture from 3-17-12 (St. Patrick's Day and our 11th anniversary)

Now that my husband and I have a family, it has been more important to us to eat together. We love to eat out, but taking kids out to eat is exhausting and we have only a few choices in our small town. Thus, I've started cooking more at home. I like to cook, but don't want to spend all day cooking, so I look for quick recipes.

Cooking using muffin tins has been an excellent way to make meals for my family that are portioned, quick to cook, easy to clean and store left overs. I hope to share my ideas with you.

I've been using muffin tins for almost a year now to make various recipes (not everyday, but once a week or so). I've been reading some other blogs (which I will share) that also use muffin tins and gathering more ideas for recipes to try. I look forward to sharing this journey with you.